CHAPTER 4 CLAY MODELLING – ARTS AND SPORTS STD 5
MAKING FLOWERPOTS
Flowerpots are containers used to keep flowers. These pots can be made using clay or cement.
Cement pots are placed in a special place for a while to dry, then carved and finally filled with flowers.
Clay pots must be dried and finally fired to make them stronger. Pots can be made by using pinching, coiling, slab, wheel throwing and moulding techniques
MOULDING
This is a method used to model pots by using a moulding technique. You must first prepare a mould of the shape you prefer to make.
A mould is a tool that is made first to give shape to other vessels by the casting method.
The caster presses the soft clay into the mould and stays there for a while until it dries, and then it is removed, having already copied the shape of the mould.
By using a mould, you get the advantage of moulding many similar objects in a short time. Figure 1. Shows an example of a mould read to be
used

Sample of a mould
MATERIALS USED TO MAKE A MOULD
Materials used in making a mould include
- Clay
- Water
- Cement
- Sand
- A mold samples
- A levelling trowels
- A thick rope about the size of a thumb
- A flowerpot
9.Wire mesh
10.Scissors
11. Newspapers
12. Liquid glue
13. Thin wood
14.Dry leaves
15.matches
16.Cotton cloth
17.A small brush
18.A small knife
19.Oil paints
20.Kerosene
21. Paint containers
22.A spade
23.A trowel
24.Plastic bucket
25.Light nylon bags
STEPS FOR MAKING A MOULD
Moulding for pots begins with creating two halves of a mould, which, when joined, form a complete pot shaped like the one you intend to make. To create a mould for a pit, follow these steps
(a.) Select a flowerpot that has a form and size of your choice, then clean it thoroughly to remove any dirt or residues
(b) Cover the flowerpot with a piece of newspaper using a strong adhesive or glue. Make sure the newspaper is smooth and has no wrinkles to create an even surface
(C) Stick a rope vertically along the flowerpot. This will divide the pot into two halves, allowing you to create a two- part mould as shown in figure below. Make sure to let the glue dry completely before proceeding with the next steps in your mould-making process.

A pot glued with newspapers and divided into halves by a rope
- Prepare a plaster mixture by mixing sand, cement and a small amount of water
- Measure and cut the wire mesh to fit both sides of the flowerpot
- Apply a 2cm thick layer of plaster to the flowerpot, and use a piece of rope to divide the plaster into two halves. Once the first layer is set place the wire mesh onto the soft plaster on both sides of the pot. Then, add a second layer of plaster to fully cover the wire mesh on both sides, ensuring the rope remains exposed
- Smooth the edges of both sides of the pot properly
- Put the pot in the shade to allow it to dry, as seen in figure below

A pot divided with a rope in the middle, and placed in the shade to dry
- Separate the pot from the two sides of the plaster layer. This process will yield two pieces that form the pot figure, commonly referred to as moulds; and
- Clean and smooth the interior surfaces thoroughly. These moulds will serve as essential tools for producing a variety of flowerpots
STEPS TO CREATE A POT USING A MOULD
-
- Begin by laying a light nylon sheet inside the mould to prevent the clay from sticking to it
- Press the clay into the mould to form a layer, similar to coconut flesh in its husk, aiming for a thickness of about 2 cm
- Smooth out the surface of the clay for evenness
- Create scratch marks along the edges of the clay; this helps to strengthen the bond when the pieces are joined later
- Allow some time for the malleable clay to set so that it does not get
- Carefully separate the mould from the clay to reveal two sides of the pot figure
- Place the two parts of the pot in the shade to dry until they reach a malleable stage, akin to how a candle or piece of soap feels stretchy without breaking
- Attach the two parts of the pot figure using firm clay, while they are still wet, to form the complete pot
- Wrap the completed pot with a wide piece of cloth and leave it in the shade to dry
- Once it is bonded, remove the cotton cloth from the pot. Your flowerpot is now prepared for decoration
- Proceed to decorate the pot using methods like engraving, imprinting or incising
DECORATING THE CLAY POTS
Decorating the clay pots is a very important step in giving them a beautiful appearance. This step requires a lot of creativity and unique
WAYS TO DECORATE POTS
There are various methods of decorating pots, such as incising, carving, scratching and using colour
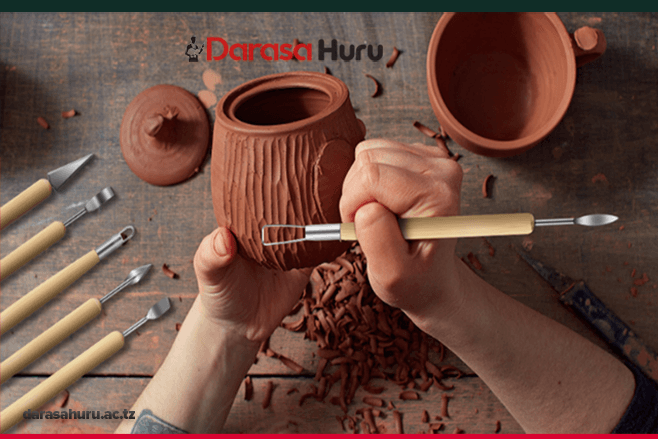
Decoration through incising, carving and scratching
To create decorative patterns on a pot, use carving tools to form shapes and structures while the clay is still soft by incising, carving or scratching.
Additionally, you can imprint natural patterns using natural materials such as leaves, wood or natural textures to leave marks on the clay before it is dried.
Figures below show pots that have been decorated through incising, carving, and scratching

A pot decorated using the incising and carving method

A pot decorated using the scratching method
Painted decorations
To decorate a pot by painting, use a brush or stick to draw lines, flowers
Geometric shapes, or any theme that you like.Use colours that are appropriate for the clay or use other coloured clay as a drawing medium. The clay in the pot should be slightly damp to make it easier to draw. Figure
6 shows a pot decorated with coloured patterns

A pot with painted decorations
(c) Stencil decoration
To decorate a pot, use a stencil with the patterns that you want. Use the appropriate colours for the clay. Place the stencil on the area you want to print the impression.
Apply the colour using a sponge or brush by gently and precisely touching the open area on the stencil. Figure 7 shows a pot decorated using stencils

A pot decorated by using stencils
(d). Decorative ornamentation
To add decorations to the pot in order to add an interesting look, use beads, pieces of metal or glass. Attach these items using glue suitable for clay and decorations to hold them effectively. Figure 8 shows a pot decorated with bead ornaments

A pot with added decorations of beads
(e) Decoration using paint
To decorate a pot, use paint that adheres well to the surface of the pot, which is water- resistant. Use a thin brush for hand- drawn designs such as flowers, leaves or natural landscapes.
Before decorating, apply one base colour to smooth the surface of the pot and let it dry completely. Use different colours for your decorations depending on the design you have chosen.
Decorating pots with paint requires special equipment and depends on your creativity.
Your decorations can reflect a feeling, theme, or style you prefer. Figure 9 shows a pot decorated with paint

A pot decorated with paint
FIRING THE CLAY POTS
Flowerpots made of clay must be fired to make them strong. The fired flowerpots are resistant to erosion, even when saturated with water.
The firing of these pots occurs in ana open kiln, which differs from an interior kiln. An interior kiln is a small building equipped with a door for passing pots and air, as well as a designated firing area and a smoke tunnel.
In contrast, an open kiln is simply a designated outdoor space where thin pieces of firewood and dry leaves are arranged in a slight pit to start the firing process.
The key to effective firing is maintaining constant heating, which is why firewood and dry leaves are preferred materials
STEPS TO BE FOLLOWED IN CLAY POT FIRING IN THE OPEN KILN
- Dig a hole in the ground shaped like a wide rectangular platter
- Place a layer of dry grass and pieces of firewood, about 30 cm in width, at the bottom of the hole
- Carefully arrange the clay pots that you want to fire on top of the layer of dry grass and firewood
- Add another layer of dry leaves and additional firewood to cover the pots completely. Once ready, light the fire to begin th firing process. Figure below shows that arrangement

Arrangement of pots, wood, and leaves in an open oven
- Add firewood and dry leaves until the pots are fully fired
- Allow the fire to extinguish and let the pots cool down completely
- Carefully remove the pots from the firing area and clean them of ashes with a cotton cloth and
- Decorate the pots by drawing various motifs as shown in Figure 11 afterwards, paint them using small flat oil painting brushes. This marks the second stage of pot decoration

A clay pot decorated with oil colour
GLAZING CLAY OBJECTS
Clay objects are glazed using glaze minerals. Glaze is a mineral that resembles powder and is mixed with water before being applied to the object.
There are three methods of applying glaze: brushing, dipping and pouring. On the other hand, there are different means of applying glaze.
Glaze can be applied directly to a dry object before firing, or the object is fired first, then glazed and finally fired again. The second means is more effective than the first one
CHAPTER 4 CLAY MODELLING – ARTS AND SPORTS STD 5
MEANS OF APPLYING GLAZE
- Mix the glaze according to the manufacturer’s instructions
- Use one of the application techniques, applying it either to a dry object or to a fired object. Allow the glaze to dry properly
- Fire in the kiln following the same arrangement and procedure as before when the glaze is properly fired, it transforms and becomes shiny and
- Decorate or embellish the glazed objects using paints and designs
STORAGE OF FIRED POTS
Storage of fired pots involves keeping clay-modelled pots safe after they have been fired and cooled. There are several reasons for storing these pots including
- Protecting them from cracks or breaks
- Keeping them clean
- Ensuring their safety during transportation and
- Extending their longevity
Fired and cooled clay pots can be stored in various ways, such as
-
- Placing them on a round pad, as shown in figure 12. This method helps prevent the pots from rolling and breaking

A clay pot set on a round pad
-
- Place the items in boxes or bamboo baskets lined with sift materials like dry leaves to prevent breakage
- Secure them within a wooden frame, ensuring they are separated by soft materials to avoid knocking against each other and breaking, as shown in figure 13

A wooden frame for a clay pot for holding and transportation
-
- Arrange clay pots in a pyramid format, as shown in figure 14. In this arrangement, large and heavy pots are placed at the bottom while small and light ones are placed at the top. The bottom lines hold more pots than the top lines. This arrangement is designed to protect clay pots from sliding and falling. Moreover, the small pots will not break due to their weight

Pots arranged in a pyramid format
CLEANLINESS OF THE WORKING AREA
The area where work is done can be dirtied or destroyed. Therefore, it must be cleaned and reorganized properly. In clay modeling and firing tasks, the following activities should be done
- Putting out the fire in the kiln
- Collecting ashes and burying them
- Cleaning leftovers and burying them
- Filling up and levelling the holes from which clay soil was obtained and where the kiln was set
Exercise
- Explain the proper ways of storing pots made from clay in the community
- Describe how to use glaze in adding a shiny finish to clay objects