CHAPTER 3 DRAWING – ARTS AND SPORTS STD 5
Singing enables the artist to convey a message or feeling through songs.
In this chapter, you will learn about musical dynamics, voice balance, and how to sing solfa accompanied by musical instruments.
The competencies developed will enable you to sing various songs while observing musical dynamics and voice balance, as well as using musical instruments to accompany solfa singing.
DRAWING IMAGES THAT EXPRESS EMOTIONS AND SITUATIONS
Drawing images that express emotions and situations is an art that requires attention to the use of lines, shapes, balance, shadows, colours, cohesion and texture.
This kind of drawing requires a good arrangement of the image during sketching
DRAWING MATERIALS
There are some of the materials used in drawing images. These are
- Pencil
- Sharpener
- Paper
- Eraser
- Table and chair
- Drawing board
- Paper clip
SHAPES
Drawing involves how the artist creates and uses shapes to convey ideas , feelings or stories through art.
In the drawing, shapes are used to create structure, proportion and balance in the image
PRINCIPLES OF USING SHAPES IN DRAWING VARIOUS OBJECTS
The following are important techniques to consider when using shapes in drawing
- Use circles to start drawing parts of circular shapes, such as head, a wheel, or parts of flowers
- Use rectangles to show parts of objects with long sides, such as buildings, doors or books
- Use four or three- sided shapes to create objects with triangular and rectangular proportions, such as windows or boxes
- Draw several shapes together to create a complex drawing. For example , connect circles and rectangles to create body of a human being, animal, bird or car
- Observe the size of the shape and space within to show the proportion of the object you are drawing
- Use sketch lines to get a map of the real image before drawing it, then draw the real image following those lines
- Add shadows to the shapes in order to acquire depth and realism of the image
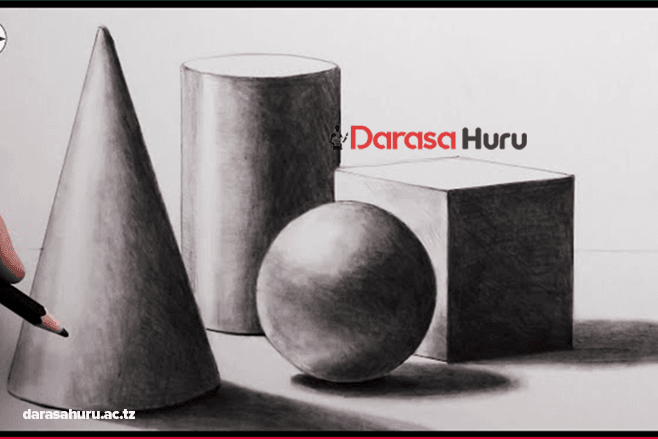
CIRCULAR SHAPE
Drawing using a circular shape is very important in artwork. This is because the circles is used as a basic part to draw other shapes, such as a mouth, head or wheel. The skills required for an artist are steady hand in drawing lines and knowing the proportions of the circle you want to draw
STEPS TO DRAW A CIRCULAR SHAPE
There are many ways to draw a circular shape. In drawing some of these shapes, it is important to consider the following steps
1. Draw a square as demonstrate in step 1
2. Divide at the center the drawn square in each side by using a dot as demonstrate in step 2
3. Draw the circle by following the dots placed on each side of the squares as demonstrate in step 3
4. Erase the squares to remain with only the circles as demonstrate in step 4

Steps to draw the shape of a circle
SQUARE AND RECTANGULAR SHAPES
These shapes are known as quadrilateral shapes. These are shapes with four sides and are used to represent objects such as buildings, doors or boxes
A square has four sides, all of which are the same size. A rectangle has four sides, where the two longer sides are equal in length and the two shorter sides are also equal in size
STEPS IN DRAWING A SQUARE AND A RECTANGLE
1. Draw a bottom line as the base of the square or rectangle
2. Draw two parallel vertical lines up from the two ends of the bottom line
3. Draw a top line parallel to the bottom line to connect the two side segments
4. Make sure each side of the square is of the same length and For a rectangle, draw two parallel vertical lines, which will be the long sides and then draw parallel horizontal lines to connect the two sides of the vertical lines, which will be the short sides. Figure 2 shows examples of the square and rectangle

A square and rectangle
A CYLINDER
The use of cylinder shapes in drawing is a basic skill in drawing. It is used as a basis for drawing various objects that a similar shape and enables you to draw interesting figures such as human beings, animals and landscapes
STEPS TO DRAW A CYLINDER
1. Draw a horizontal rectangle, divide each side at the centre by placing a dot, and draw an oval shape by following the placed dots as demonstrate in step 1 in Figure 3
2. Draw the vertical line downward from the left and the right dot as demonstrated in step 2
3. Repeat step one to draw the bottom oval shape as demonstrated in step 3 and
4. Erase all unwanted lines to remain with a clear cylinder shape as demonstrated in step 4

CUBE AND RECTANGULAR CUBOID
A cube and rectangular cuboid are similar shapes, except that a cube is shorter and rectangular cuboid is longer. A cube shape has the appearance of a box with all four sides of the same length. These shapes can be used as the basis for drawing different objects, like buildings
STEPS TO DRAW A CUBE AND RECTANGULAR CUBOID
1. Draw two overlapping cube shapes of the same size, except that one is slightly higher than the other as demonstrate in step 1
2. Connect the shapes by drawing four lines that connect the four corners of one shape to the four corners of the other shape as demonstrate in step 2 and 3

Steps to draw a cube
3. For the rectangular cuboid, draw two overlapping rectangular shapes of the same size, except that one is slightly higher than the other as demonstrated in step 1
4. Connect the shapes by drawing four lines connecting the four corners of one shape with the four corners of the other shape as demonstrate in step 2 and 3
Steps to draw a rectangular cuboid
USING SHAPES IN DRAWING VARIOUS OBJECTS
In drawing shapes can be used to draw different images. For example, human being and animals
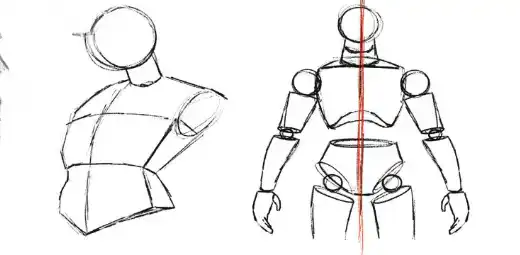
DRAWING HUMAN BEING
Drawing a human being’s portrait using shapes is important to first understand the proportion of the body parts, which are the head, arms, chest and legs
Therefore, you should practice drawing the human being, guided by the use of the shapes that you have learned
DRAWING A HUMAN BEING’S HEAD
To draw the shape of a human being’s head, consider the following steps
1. Draw two overlapping circular shapes – one resembling a ball and the other shaped like a mango
2. Divide the shape you have drawn in to three parts using lines
3. Draw line to indicate the position of the ears, eyes, nose and mouth
4. Then, draw the ears, eyes, nose and mouth following the guidelines you created in step three

How to use circular shapes in drawing a head
DRAWING HUMAN BEING’S HANDS
Drawing the human being’s hands, start by drawing one hand and finalizing by drawing another hand.
Draw two cylinders connected by a circle shape to get the shape of one complete hand. Repeat this step to draw the shape of the second hand as shown in figure 7

The use of cylinder shapes in drawing the human being’s hands
DRAWING HUMAN BEING’S CHEST
There are some steps considered in drawing a human being’s chest. Firstly, draw a map of the chest by drawing a cube. Then draw cylinder shapes to the left and right of the cube to create the shapes of the arms on the shoulder.
After that, connect the corners of the cube and the cylinders using a pencil to complete the chest shape. Figure 8 shows how to use a cube and cylinder in drawing the human being’s chest

The use of cube and cylinder shapes in drawing the human being’s chest
DRAWING THE HUMAN BEING’S LEGS
Darw two cylinders connected with circles to form one complete leg. Repeat this step to draw the second leg

Use of cylinder shape indrawing the human being’s legs
DRAWING A FULL HUMAN FIGURE
To draw a human figure, draw the shapes of the head, chest, arms and legs and connect them so that each one fits into its part to make a human figure

Using shapes to draw a full human figure
DRAWING HUMAN BEING IN DIFFERENT POSTURES
People can be drawn in different positions, such as sitting, sleeping, walking, jumping and so on.
The position of the body parts describes the postures of a human being, whether sitting, lying, walking, running or jumping.
For example, if you want to draw a human being lying, you will make sure that their arms, legs, chest and head are drawn in a horizontal direction.
If you want to draw a human being walking or running, you will draw the arms, legs, chest and head positioned between the vertical and horizontal direction, that is, between horizontal and vertical

Use of shapes indrawing a human being appearing in different postures
DRAWING ANIMALS
Many animal drawings are guide by circle and cylinder shapes. What differs is the dimensions between one type of animal and other. Small animals such as dog use small dimensions of the circle and cylinder shapes. Large animals such as cows use large dimensions of the circle and cylinder shapes

Use of shapes in drawing a dog
LINES
Lines define shapes and show boundaries. Lines also show reality, direction, unity, distance and depth in an image. The ability to us lines skillfully enhances the appearance of an image

An example of using lines to draw geometric shapes
Lines describe the orientation of ana image by indicating whether it has a vertical, horizontal or varied direction.
Lines can also be used to represent invisible elements, such as the direction of the wind. Additionally, lines are used to indicate distance in ana image
IMAGE APPEARING IN VERTICAL DIRECTIONS
The viewer can infer the direction of the lines from how they are oriented.
For example, in figure 14, the lines in trees indicate a vertical direction

An example of ana image appearing in vertical direction
IMAGE APPEARING IN HORIZONTAL DIRECTION
The use of lines is very important when drawing horizontal images, as they help to show direction, depth and composition in the image for example, the lines in figure 15 in the tree show the horizontal direction.
Look at the position of the log, also examine the lines inside the log, and in the cut section, you will see the horizontal direction.

An example of an image appearing in the horizontal direction
IMAGES APPEARING IN DIFFERENT DIRECTIONS
In drawing, lines provide guidance on how to create an image that reflects different orientations.
Each type of direction relies on the use of a specific kind of line. Figure 16 is a stump, where the log has been cut.
Examine the direction of the lines in the image, you will notice that the lines in this image show different directions

An example of an image appearing in different directions
IMAGES WITH WIND DIRECTION
In drawing, lines can be used to draw images showing the direction of the wind. Examine the direction of the lines in the trees in figure 17, and you will notice that they show the direction of the wind
IMAGES THAT DEMONSTRATE DISTANCE
Drawing images that show distance requires various techniques of using lines, proportion, and direction of the painter. To draw an image that demonstrates distance, it is important to consider the use of lines, proportion and direction of the painter. The image in figures 18 and 19 show the appearance of distance
Examine the use of lines that express distance in these images

An example of an image demonstrating the direction of the wind
IMAGES THAT DEMONSTRATE DISTANCE
Drawing images that show distance requires various techniques of using lines, proportion, and direction of the painter.
To draw an image that demonstrates distance, it is important to consider the use of lines, proportion, and direction of the painter.
The image in figures 18 and 19 show the appearance of distance. Examine the use of lines that express distance in these images.

Use of lines to demonstrate a distance

Use of lines to demonstrate a distance by using proportions
SHADOWS
Shadows in a picture indicate the direction from which light is coming.
Shadows are used to separate one shape from another in the image. Figure
20 shows picture with shadows that depict the direction of the light source

An example of an image showing the direction of the light source
BALANCE
Balance is the state in which the weight of ana object is evenly distributed on all sides to ensure stability.
This weight can be physical, felt when carrying something or visual, perceived by looking at objects.
In drawing, balance refers to the visual weight perceived through sight. An image needs to have a balance; otherwise, it may make the viewer feel a sense of imbalance and instability.
For example, figure belo shows an unbalances image where the artist places many objects (a tree, a rock and hill) On the left side, making the image appear tilted toward that side.

An example of an image demonstrating an imbalance scenario
Additionally, figure 22 shows a balanced scenario, where the artist places objects such as trees, grass, and mountains on both sides, creating equal visual weight on the left and right sides of the image

An example of an image showing a balanced scenario
COLOUR
Colour enhances beauty and describes objects with a great sense of realism and clarity. It is also used to differentiate one object from another in ana image
For example, the green colour often represents plants, the blue colour indicates the ocean or mountains seen from a distance, and the brown colour represents the earth.
Figure below shows colour portrays realism in the painting and distinguishes the objects, such as mountains, plants and the land

An example of a painting with an accurate use of colour
TEXTURE
We are surrounded by texture. Texture is found in everything. It appears on the surfaces of various objects, such as tree bark, stones, soil, animal bodies and more.
Texture is an important aspect of drawing that helps to bring emotion, realism, and appeal to the artwork.
Texture helps in enhancing realism, adding visual interest, providing different interpretations for viewers and helping the artist convey their message through drawing
There are two types of texture
- The texture felt by touching
- The textures perceived by looking
An artist can represent texture in an image. Figure 24 shows different appearances of textures in the image

Different appearances of the texture
Similarly, texture and shadow in drawing can affect the balance of ana image, as shown in figure 25 and 26. Figure 25 shows how the heavy shadow on the lower part of the left shape causes the balance of the image to lean on that side

The texture formed by heavy shadows and how it affects the balance of the image
Figure below shows the texture crated by light shadow and how it affects the balance of the image

The texture formed by light shadows and how it affects the balance of the image
IMAGES WITH UNITY
Unity in drawing refers to the condition in which the elements appear to be related or connected.
Unity helps the viewer to understand the message or emotion intended by the artist.
To create a unified drawing, it essential to consider the relationship between the elements within the artwork.
Figure below shows the image with related objects to one another. In contrast, Figure 28 lacks unity because the objects in the image lack a clear relationship

Exercise
- Explain why lines that show perspective are important in drawing
- Describe the use of lines in a drawing of images